Managing a home network with kids in the house can be stressful. When I was growing up, I remember this as a time of “the internet wild west” when broadband just started to replace 56k dial-up connections. It was easy to be exposed to things that as a kid, I may not have wanted (or should have been allowed to be) exposed to. Also, growing up in a household with other kids, there was at least one instance of a malware infection, and nobody knew who was responsible. This was a time when ad technology was new and may not have been as targeted. Nowadays, you do a web search on a medical condition out of curiosity (at least on certain search engines), and you start to get targeted ads all over the place.
Let me introduce you to Pi-hole. It is a DNS sinkhole that subscribes to IP block lists that can be used for blocking ads, telemetry, malware, and more. It is typically run on a Raspberry Pi (hence the name) but can run on other systems, typically in a virtual machine or a docker container. I will go over my setup, including additional layers of filtering such as DNS over HTTPS (DoH), OpenDNS FamilyShield (to block adult content and malware domains), redirection of hard-coded DNS to prevent bypassing, IoT device security and general security practices.
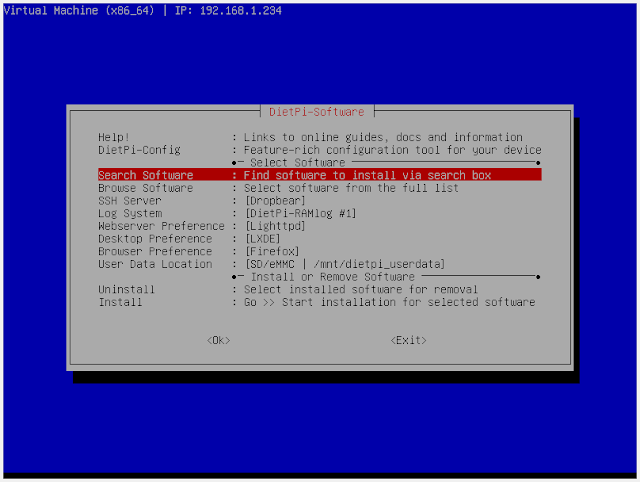
Pi-hole setup
I am running Pi-hole on DietPi OS (Raspberry Pi Debian based Linux distribution). It has a lot of neat features including DietPi optimized software (such as Node-RED, Domoticz, and the Mosquitto MQTT broker), RAMlog (extends SD card life), backup functionality, and more. If you’re going to set up a Raspberry Pi, I recommend an “endurance” micro-SD card to further extend the micro-SD card life. For the purposes of this guide, I am running the Pi-hole installation in a VirtualBox virtual machine. It is recommended to have two separate instances of this setup in case of hardware failure or other unforeseen issues (a combination of a Raspberry Pi and a virtual machine running separately would be fine if you only have one Raspberry Pi). If running on a Raspberry Pi, a model 3 or 4 is recommended (I am running one on both). If running only on virtual machines, make sure the virtual machines and hardware they are running on start automatically in the event of a power outage. Use a battery backup for either setup if possible. To install Pi-hole on a machine running DietPi OS, run the command sudo dietpi-software. Additionally, one can run sudo dietpi-launcher to see what other built in DietPi commands are built into the OS. If using multiple instances of this setup, be sure to change the hostname (DietPi-Config -> Security -> Hostname)
DietPi launcher
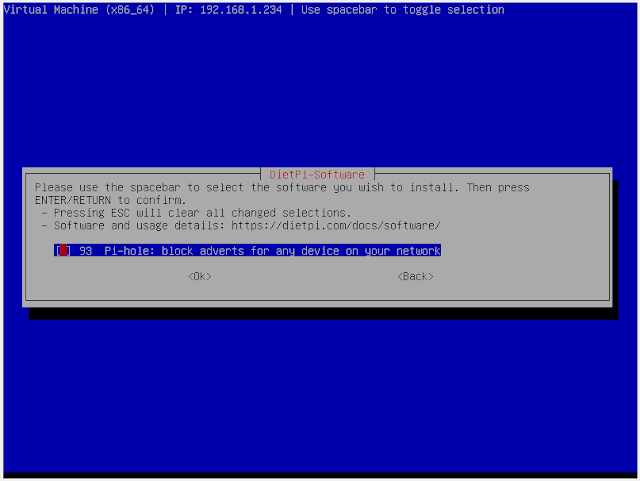
DietPi softwareFrom the DietPi software screen, either browse to or search for Pi-hole and install the software from there

Decline the option to install Unbound. While it does increase privacy in the sense that repeated queries won’t be logged on the upstream DNS server, and could be configured to be used with DoH, it won’t be covered in this guide.
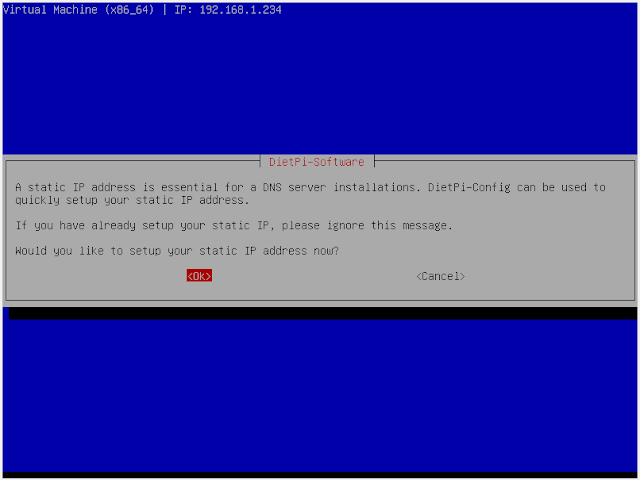
Set up a static IP address if you haven’t already.
This will take you to the DietPi-Config network menu. Select the Ethernet or Wifi adapter (Wifi not advised for this setup), change mode to Static, and apply the settings. Then exit out of the DietPi-Config menus.


Returning to the DietPi-Software menu, select Install and confirm to proceed with installation of Pi-hole.
Installation of Pi-hole will begin
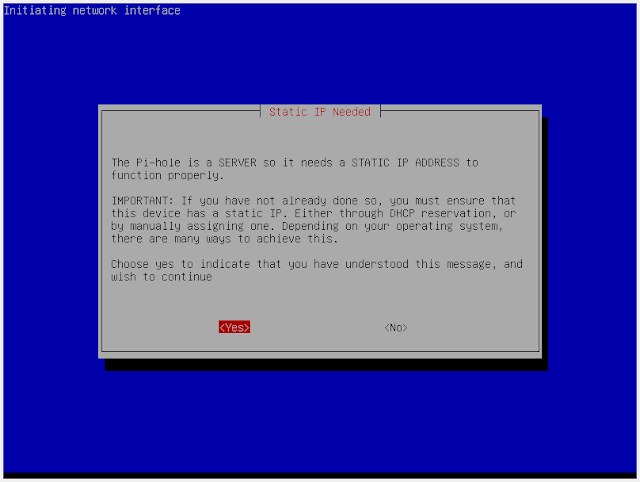
Proceed through the wizard, indicating that yes, you have set a static IP.
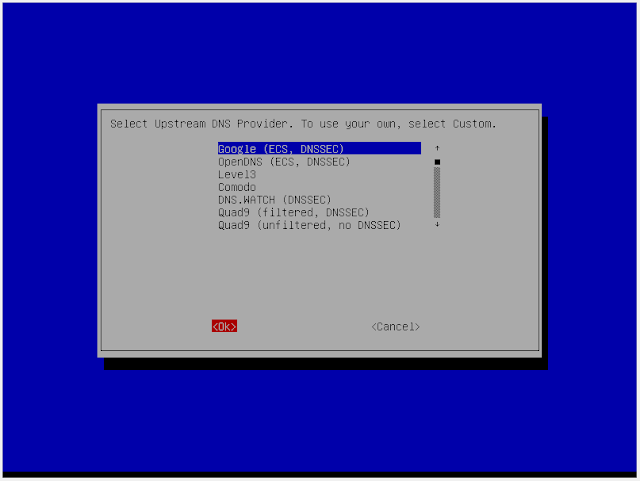
Select any upstream DNS provider. This doesn’t matter as it will be changed later.
Select the default host list. Custom host lists can be added later
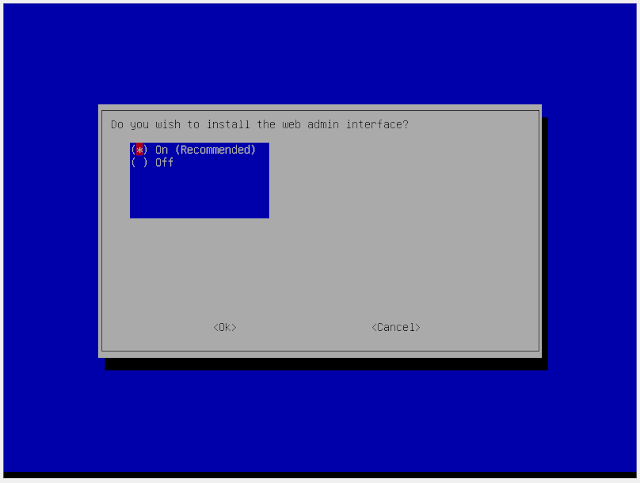
Choose to install the web admin interface. It is possible to configure Pi-hole without the web interface, but it is not recommended unless you know what you are doing.
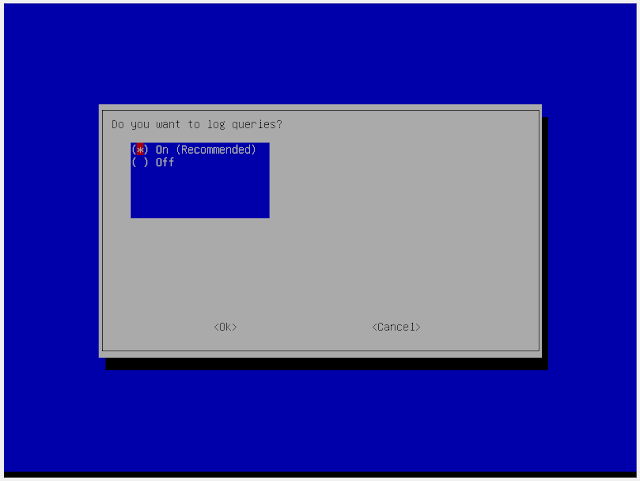
Choose whether to log queries. Logging queries can help with whitelisting/blacklisting certain domains to improve the Pi-hole experience for the trade-off of reduced privacy (being able to see user’s DNS queries). Queries can be turned on/off later.
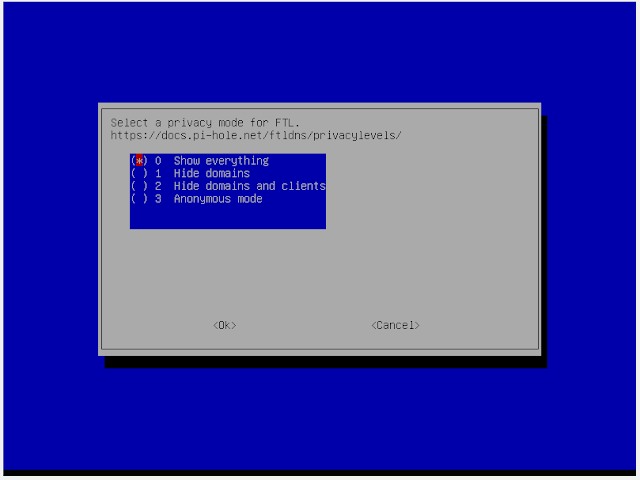
Choose the privacy level for FTL (the local DNS cache). Using the privacy level of “Show everything” can facilitate adding clients/groups for the purpose of whitelisting/blacklisting certain domains (for example for somebody that likes clicking ads in search results or games that require ads).
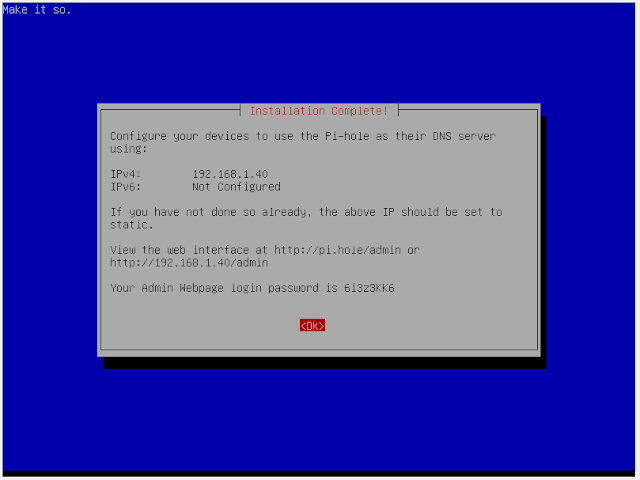
At this point installation will continue and prompt you with this screen. It will remind you to configure your devices to use Pi-hole as the DNS server which will be done later. Be sure to take note of the Admin Webpage password now (which will be changed later) or else you will have to reset it from command line. Also take note of the web interface address (best to take a screenshot just to be sure).
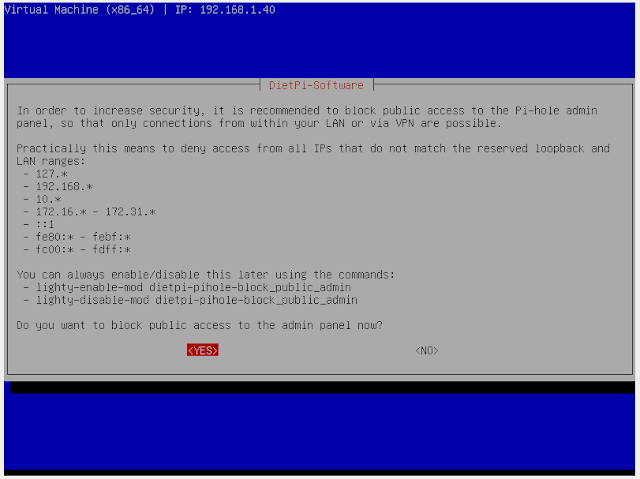
Even though your Pi-hole is likely behind a firewall, it can’t hurt to block public access in case your configuration changes.
At this point the install will complete and bring you back to the DietPi-Launcher or DietPi-Software screen.


Cloudflared (DNS over HTTPS) + OpenDNS
At this point you could point your devices to Pi-hole by either setting the local IP settings per device or configuring DHCP in your router (which will be covered later) to tell clients to use the Pi-hole for their DNS servers. This would already provide an enhanced experience as far as blocking ads, malware, and telemetry. We will go through the steps needed to configure cloudflared to use OpenDNS FamilyShield as the DoH endpoint.
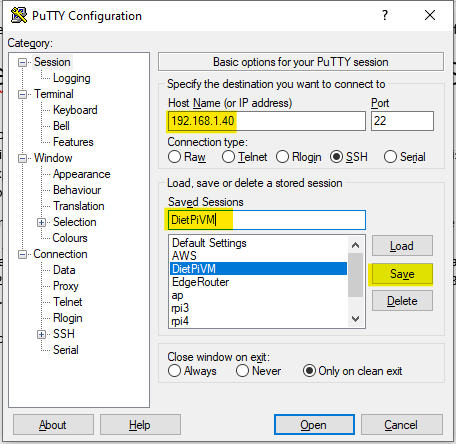
After setting up static IP access to DietPi OS, you may want to connect via SSH with the PuTTY client (if you aren’t already). Enter the IP address, create a name for the saved session and click save.
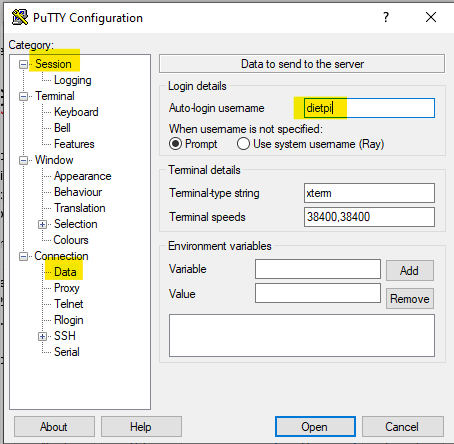
Additionally, for faster login, select Connection -> Data, enter the dietpi username into the Auto-login username field. Go back to Session and save again. Next time when launching the session you’ll just have to enter the password for the dietpi account (which should have been set during the initial DietPi OS setup). If the PuTTY client is pinned to the Windows taskbar, right clicking it will bring up recent sessions to launch for even quicker access. Upon the first SSH connection you will be prompted to accept the host key (if security is a concern, it is advised to configure the DietPi SSH server with a public key, not accepting password logins, and connect via a password protected private key configured in the PuTTY client, but that will not be covered in this guide as there are plenty of guides out there covering this).
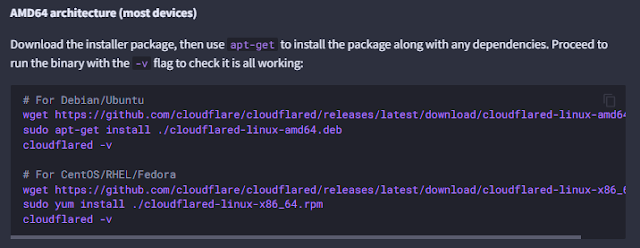
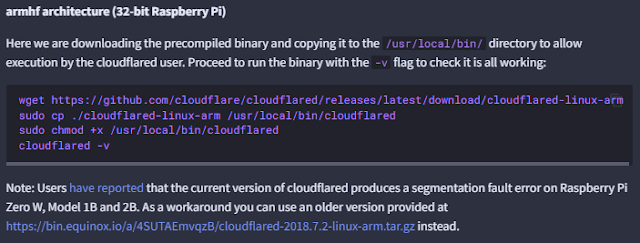
Navigate to the Pi-hole documentation for the steps to set up DoH. If setting up for a virtual machine on a PC, you will likely need to use the AMD64 architecture. If using a Raspberry Pi 3, use the armhf architecture (if using a Raspberry Pi 2 you may need to use an older version of cloudflared which is why a model 3 or above is recommended). If using a Raspberry Pi 4 use the arm64 architecture. Copy and paste the commands into the SSH session (right click in the SSH session to paste).
AMD64 architecture (for use on a PC/virtual machine).
armhf architecture (Raspberry Pi 3)
arm64 architecture (Raspberry Pi 4)Follow the steps for the “manual way” of configuring cloudflared. The “automatic way” is not advised as it configures the service as the root user (and least privilege is a good security practice).
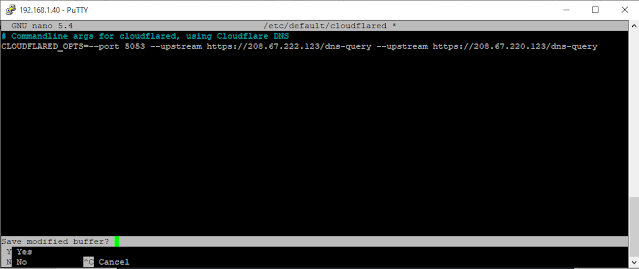
Important: on the step to edit the configuration file (sudo nano /etc/default/cloudflared) replace the Cloudflare DNS IP addresses with the OpenDNS FamilyShield IP addresses (use ctrl-x to save in the nano editor). Continue the rest of the steps of installing the “manual way”.
Modified configuration fileThe output of the history command shows the commands I have executed did not need to deviate from the documentation


Pi-hole configuration
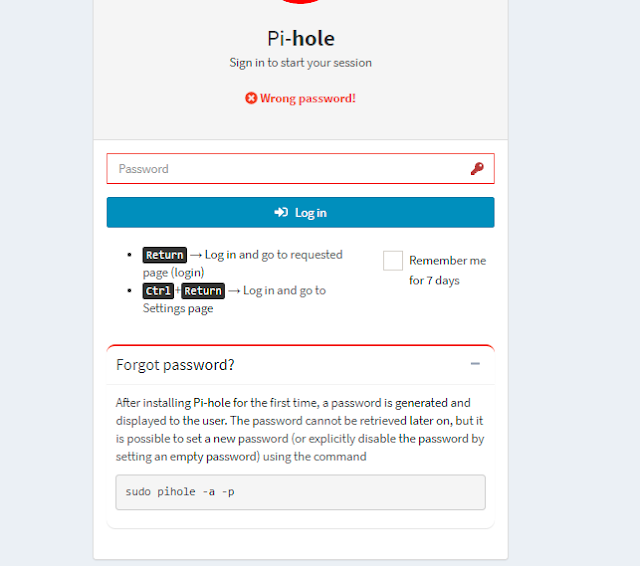
Log into the Pi-hole web interface (the URL is on the same screen the web interface password is provided). If you don’t have this information, the URL is the static IP address followed by /admin. Since the web interface only supports HTTP traffic by default, the password will be transmitted in plain text over the local network. If there is any concern about security on your network (packet sniffing), it is possible to enable HTTPS for the Pi-hole web interface. If you’ve installed something else on DietPi OS that uses web interface port 80, it is possible to change the HTTP port. If you’ve forgotten your password (or for some reason it doesn’t work such as from re-running the installer), it can be reset with the command sudo pihole -a -p. The Pi-hole web interface should prompt you to create a new password if using the password provided during installation, if not manually set it with the command.
Navigate to Settings -> DNS, uncheck the Upstream DNS Servers that were configured during the installation, and set 127.0.0.1#5053 as the Custom Upstream DNS server. Scroll down to the bottom of the page and click the Save button. If using 2 Pi-hole instances the Pi-hole DNS name could be changed, but I did not need to do that as I configured my DHCP server to just use the IP addresses.
To verify that the Pi-hole is working, on a windows client run the nslookup command to enter the nslookup console. Enter “server [Pi-hole IP]” into the nslookup console to point to the Pi-hole for DNS query testing, and enter the name of a website to query. If an IP address is returned this means that DNS resolution is working
To verify that OpenDNS FamilyShield is working, run a query on internetbadguys.com. If the IP 146.112.255.155 (at the time of writing) is not returned by the query, that means it is working. Here I have switched to the cloudflare DNS server and re-run the query just to be sure that the returned IP addresses are different.


Router configuration
At this point the Pi-hole is ready to be used by local network clients, either by manual configuration or by configuring the DHCP server. Look up the documentation specific to your network router to configure the DNS servers for DHCP clients. After configuring your DHCP server it may take some time for clients to pick up the DNS server settings as leases get renewed. Manually renewing the DHCP lease ( ipconfig /release && ipconfig /renew on Windows clients ) will force the client to pull the new settings. Note that I have used the IP addresses of my previously configured Pi-hole instances and not the IP address of the demonstration virtual machine.
Depending on your router, configuration can be taken a step further by redirecting hardcoded DNS queries and forcing them to use the Pi-hole as the DNS server. This can be useful for devices that may be hard-coded to use certain public DNS servers (so as to bypass ad/telemetry blocking). If I wanted to, I could enable logging for these NAT rules to identify offenders of hard-coded DNS… maybe in the future. For my destination NAT rule, I have also allowed for a single IP address (192.168.1.41) that I can manually assign to a device if I need to bypass the Pi-hole DNS and use public DNS servers.


Final thoughts
Pi-hole
Update with the pihole -up command. Update cloudflared with guidance from the Pi-hole documentation. It is a good idea to do this regularly to ensure best performance. If scheduling with something like a CRON job, be sure to implement a verification/notification system that can notify of DNS failures.
For issues possibly caused by Pi-hole, temporarily disable with the Disable option from the main navigation. From the Query Log screen, domains can also be identified to whitelist or blacklist.
Cisco Umbrella is the enterprise equivalent to OpenDNS and is recommended to protect corporate networks.
Monitoring of Pi-hole with the API is possible. In a future post I will cover this as well as Domoticz alerts to notify if Pi-hole stops responding to DNS queries.
Browsing habits
Avoid unfamiliar websites and search results, especially sites that re-publish content (such as sites that republish GitHub issues)
Consider using a browser extension such as uBlock Origin as an additional layer of defense, or using a browser with built-in protection.
Consider using a privacy focused search engine as the default search engine. A neat feature of the DuckDuckGo search engine is being able to prepend queries like g! Pi-hole (with a space in between) to automatically redirect to Google Search. This is can be helpful for certain technical searches that are hard to find good results for.
IoT best practices
If possible, configure cloud based IoT devices to use a guest network that is isolated from the Local Area Network. This may not work in all cases but is a good defense against potential future supply chain attacks.
Princeton IoT Inspector is a useful tool for identifying potentially malicious IoT devices (if they are using the internal network). This tool uses ARP spoofing so it may cause network issues while in use. I have had a couple years ago identifying that certain cheap smart bulbs (“magic hue” bulbs ordered from AliExpress) were sending an alarming amount of traffic to an IP address in China. There is a chance that this could have just been a very poor implementation of serial over IP to control the devices, but unlikely. It’s likely that they were doing packet sniffing and sending data back to the “command and control” server which highlights the importance of using TLS (and not re-using passwords) even in home environments. In retrospect I should have known better.
Use ESP8266/ESP32 based devices that support custom firmware such as Tasmota, ESPurna, or ESPeasy. Using such devices would necessitate the setup of a home automation system such as Domoticz or Home Assistant and you will likely need an MQTT broker as well (if using firmware that doesn’t have an HTTP API). Devices pre-flashed with the Tasmota firmware can be purchased here.
General security practices
Don’t re-use the same password for multiple sites/systems
Use TLS/HTTPS whenever possible
Configure systems/applications with least privilege if possible
Install operating system updates, application updates, network device and IoT firmware updates regularly. New security vulnerabilities are being discovered every day. Installing applications with Ninite and re-running the installer later can be a great way to keep applications up-to-date.
For wireless routers consider using PMF (Protected Management Frames) if possible (at least in high-density population areas). This protects against the unlikely event of deauthentication/disassociation attacks against your WPA/WPA2 wifi network (which can be used to crack the network password). I had the feature enabled for my Ubiquiti AP-AC-PRO on the 4.x firmware, but when upgrading to the 5.x firmware I had to turn it off as only about ¼ of my devices would connect with it turned on. It's probably overkill for home networks but this feature is crucial in protecting a corporate network with access points that connect to the internal network.
Use a dedicated router/firewall not provided by your ISP (internet service provider). ISP devices can fall victim to supply chain attacks (botnet infections) and it’s better to be safe than sorry.
Second opinion malware scanning with HitmanPro or Malwarebytes and checking individual files with VirusTotal (recommended when running/using files from lesser known sources)
If in doubt regarding a specific source on the internet, a virtual machine can be used to access/run suspicious content. Just be sure to take a snapshot first, to be able to restore back to.
Use device-based MFA/multi-factor authentication (such as a YuibiKey or an authenticator app) and avoid SMS/email based MFA. Also, encourage online services you use to support device-based MFA.
Signing up for an identity theft protection service associated with one of your most trusted financial institutions.
Checking login email addresses for data breaches with haveibeenpwned or BreachDirectory. I prefer BreachDirectory as it can also show partial passwords from data breaches (helpful if you’ve ever made the mistake of re-using passwords, or to help identify the site a generic data breach may have been linked to). BreachDirectory has an API as well, which I will be exploring as an option for automatic breach notification.
Make sure your router/firewall is secure by checking that UPNP is not exposed to the internet via GRC ShieldsUp. If your network fails this test either turn off UPNP or get a new router/firewall. This was the attack vector for the CastHack attack.
No comments:
Post a Comment