Saturday, July 16, 2022

Laundry Saver

If you buy a modern washing machine, chances are it has Wi-Fi connectivity and notifications for cycle completion to notify you when your laundry is done. There have been many times that I have forgotten to rotate the laundry, where the clothes start to smell like mildew. I do not have a modern washing machine. After having this happen to me several times last year, I decided to make my own solution. 

I remembered this post about a project called “your laundry is done” that uses a Sonoff (esp8266), a power sensor, and Node-RED for notifications. That inspired me to create something project of my own, calling it “laundry saver”. After having used M5Stack products for several months, I remembered they have an “ATOM Socket” kit. The kit consists of power monitoring and control circuitry (up to 10 amps) and the ATOM Lite which is connected to the socket. The socket could also be controlled by an external device, instead of the ATOM light. 

Diagram

Description automatically generated

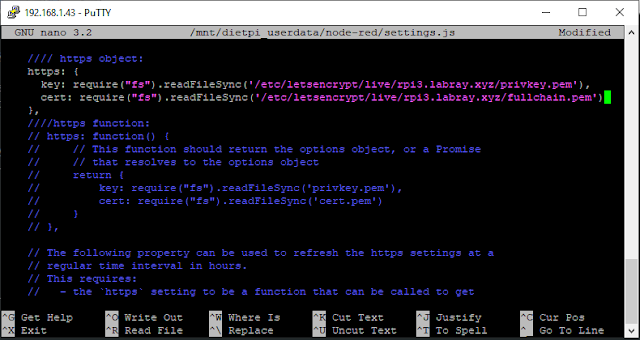
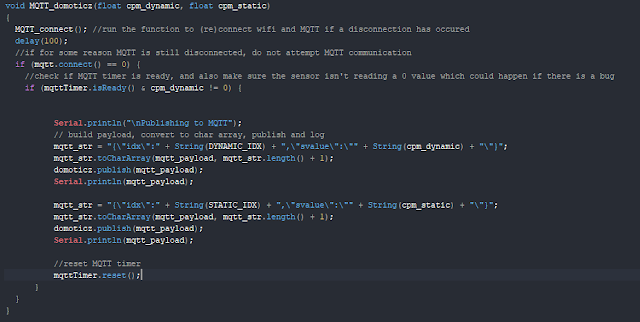
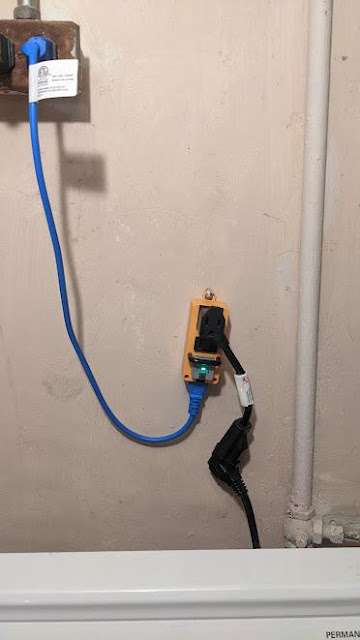
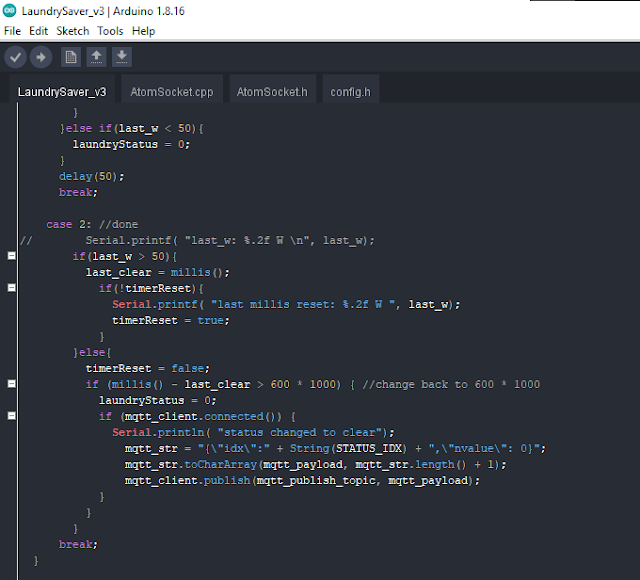
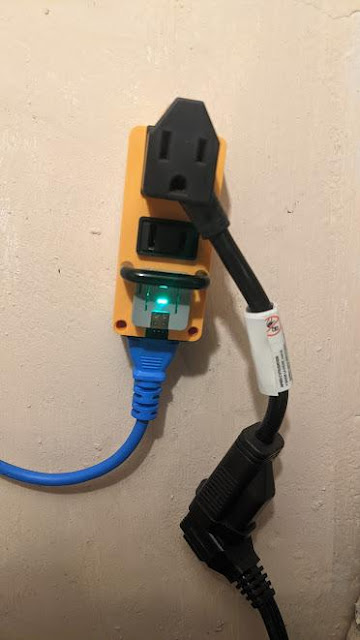
While I love using Node-RED and could have easily taken Xose’s JavaScript function and set it up in a Node-RED flow, I have had enough experience with Arduino programming (C++) that I was able to program the ATOM Socket to detect the cycles and send an MQTT message to Domoticz (when then notifies me via the Pushover app) 10 minutes after no significant power usage is detected (to allow for long fill times on the largest load size). I used a switch case statement to detect and step through the cycles, although ultimately, I would have just needed to send the notification 10 minutes after no significant power usage was detected. To connect the ATOM socket I found a short NEMA cable with the required power rating, and a short extension to angle the washer power cable away from blocking Wi-fi signal to the ATOM socket. For prototyping I just used a box fan to simulate cycling through the loads. 

A picture containing dirty

Description automatically generated

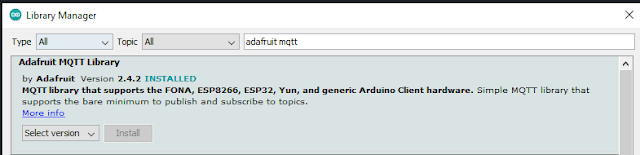
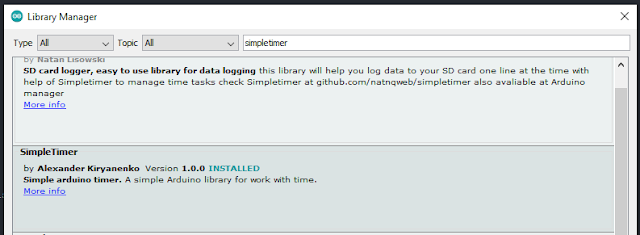
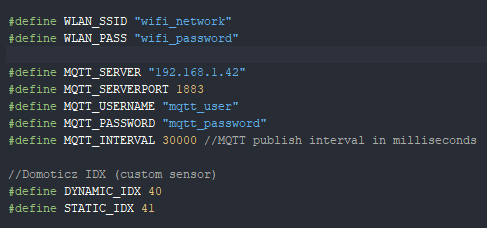
While creating the project I struggled to find some example code that would interface with the power control/monitoring while also being able to communicate via MQTT. I did some searching on GitHub and found this project yoggy/mqtt-m5atom-socket; however upon testing it out, I noticed that phantom button presses occur (which had the effect of randomly disabling power to the ATOM Socket). After doing some research I found that was due to a Wi-Fi sleep setting, which I tested a fix and submitted a pull request to the repository which was merged (yes that is my older Github account). With that out of the way I was ready to do some coding. I installed the M5Atom Arduino library and slapped together a sketch that included cycle completion notification and power monitoring, with all the settings in the config.h file.


Text

Description automatically generated

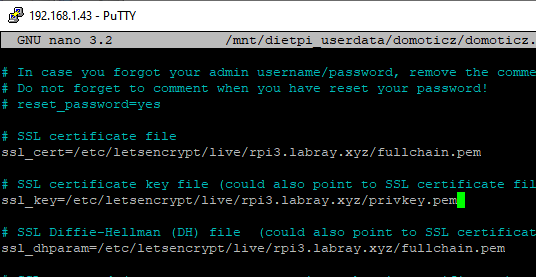
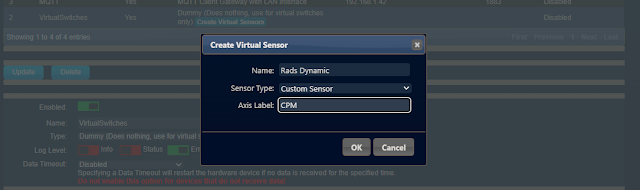
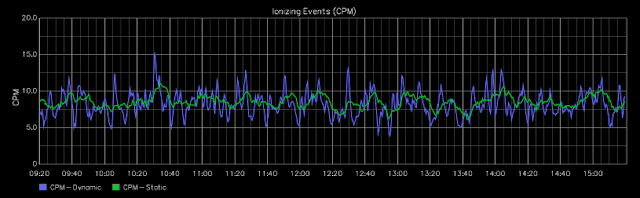
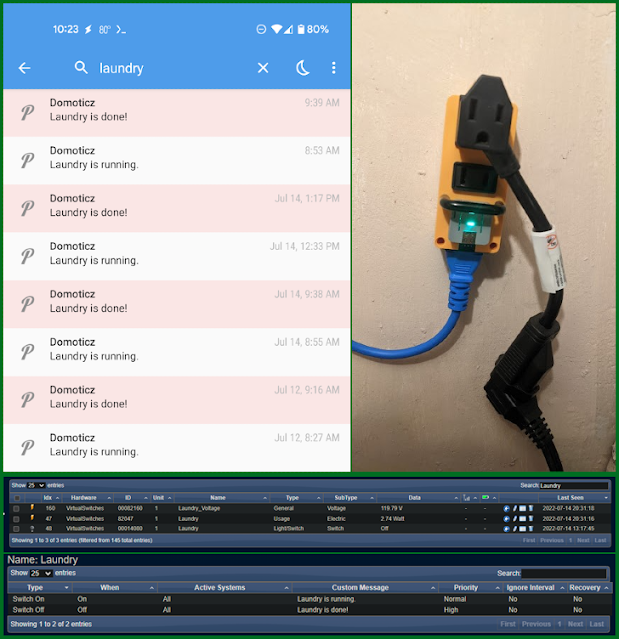
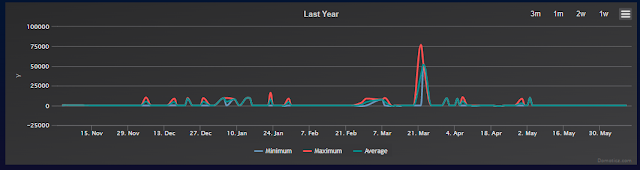
In Domoticz I created 2 virtual sensors (one for watts and one for voltage), and a virtual switch as a Boolean status if laundry is running. Monitoring watts allows me to calculate the cost of energy usage, and monitoring voltage allows me to detect under/over-volt events such as brownouts or power surges (which helps to correlate electrical funkiness with sensitive equipment around the house).
Graphical user interface, application

Description automatically generated

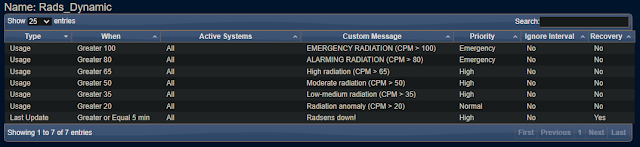
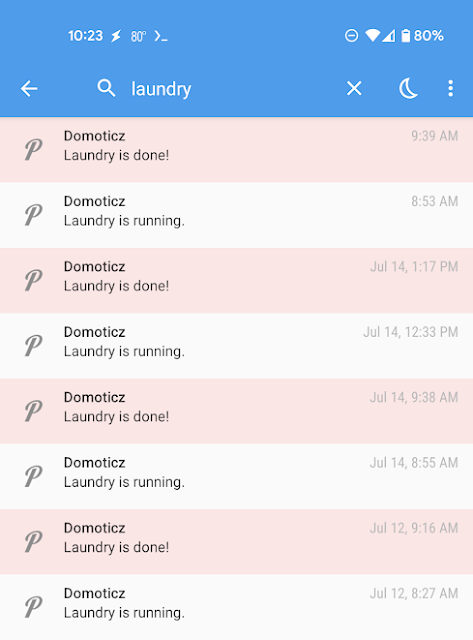
For the Laundry virtual switch, I set descriptive notifications that I receive via the Pushover app (which I have Domoticz configured to use the Pushover API):
A screenshot of a computer

Description automatically generated

The pushover alerts come in through my phone, and the different priority levels can be used to set separate notification sounds and even bypass do not disturb mode.


I had issues with the ATOM unit staying connected to Wi-Fi until I added another access point to my home setup. I added the AP to the basement to create a better network connection for my lab environment (previously having used the unreliable powerline Ethernet), and it turns the AP not only provides a downlink for my lab environment but extended the Wi-Fi coverage. I had originally thought about modifying the M5Stack ATOM to include an external antenna, but when I added the AP that solved the connectivity issue. Additionally, the mini-extension cable I added made it so the thick power cable did not cover the Atom unit and interfere with Wi-fi connectivity. 


Experimenting with imbalanced load detection


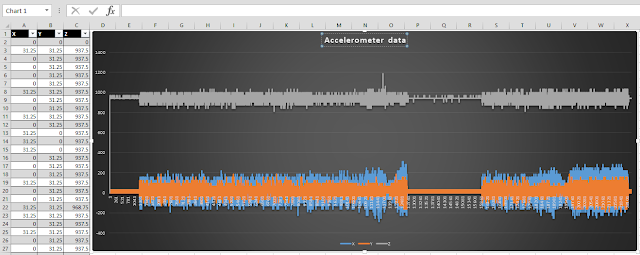
In addition to cycle completion notifications, most modern washing machines also have imbalanced load detection which will stop the cycle (and likely send a notification), and prompt the user to re-balance the load. I attempted to add this feature to the project with an accelerometer. To gather some data I threw an Arduino sketch on the M5Stack Core2 to write the accelerometer readings to a micro SD card. I was able to gather some good data about what the peak movement of some loads look like. 

However, when reading the accelerometer values with the sensor plugged into the ATOM Lite, I was getting some wildly inconsistent values that I could not work with. I am pretty sure that this was due to electrical interference with the accelerometer being connected to the same microcontroller that is also switching and monitoring power to the washing machine (so I ended up disconnecting it and removing the code for this). 

To make this work I might have to wire up a second microcontroller to monitor the accelerometer readings. It’s possible I could just daisy chain another ATOM unit from the first one if power is stable. The switch case statement described above would have facilitated the “imbalanced load” detection by pausing and resuming cycles (with some additional code), to ensure that the “laundry done” alert is only really sent when the last load has finished. Either way, avoiding full loads helps to avoid imbalanced loads, so I don’t have the problem very often.


Saturday, February 19, 2022

TLS on DietPi with LetsEncrypt/Certbot


In a previous post, I went over the importance of using TLS whenever possible and demonstrated some steps to secure local applications such as Node-RED and Domoticz with self-signed SSL certificates. Since I have a domain name (with Ionos) that I use for my home lab, I figured I would try out the LetsEncrypt/certbot functionality built into DietPi OS. Typically, an SSL certificate would have a Certificate Signing Request (CSR) that that is manually generated then submitted to the Certificate Authority (CA) in order to obtain the SSL certificate and private key that is needed to configure TLS/HTTPS. 

Certbot automates most of this process, and automatically configures (some) web applications to use the new SSL cert. When running the process on DietPi OS, the Pi-hole installation is automatically secured. We will go through the steps to make this work, as well as manually configuring Node-RED and Domoticz to use the SSL cert/key moving forward. LetsEncrypt certificates are good for only 3 months, so you would need to repeat this process about every 2.5 months (so you may want to stick with self-signed certs if this is too inconvenient). If you are serving a public facing web server, the renewal process is automatic. Additionally, if you wish to have a longer-term certificate (up to 1 year for most domain providers), you could look into the SSL certificate options provided by your domain provider (usually a wildcard cert is free) and learn how to manually configure SSL certs for your resources (which doesn’t rely on the DNS/port 80 validation that certbot does). 

  1. In your domain management DNS records, add “A” record(s) for the subdomains you wish to use (to your public IP address found by searching “my ip address” in a search engine). This is required for the LetsEncrypt certbot verification to work.
    Graphical user interface, text, application, chat or text message

Description automatically generated

  2. In your router, create a port forwarding rule to forward port 80 to the IP address of the device you are securing. This is only temporary to complete the certbot process. Some ISPs may block port 80; if this is the case you may have luck trying
    A screenshot of a computer

Description automatically generated

  3. Run the command sudo dietpi-letsencrypt. Configure the options and select Apply.
    Graphical user interface, text, application

Description automatically generated

  4. When the configuration completes, take note of the certificate and key paths. Repeat steps 2-3 for any other subdomains/devices you wish to secure. IMPORTANT: The port forwarding rule from step 2 should now be deleted/disabled if this is a service you only intend to access on your local area network.  Although the DietPi documentation advises to keep port 80 forwarded for automatic renewal, in the day and age of Zero Day exploits such as Log4Shell, and the fact that these are services I am only using in my internal network, I prefer to do the renewal manually. You may also wish to delete the DNS records as well, as they can be easily recreated at the time the renewal will need to be completed.
    Text

Description automatically generated

  5. To access the DNS name locally, a mapping would need to be created in Pi-hole Local DNS -> DNS Records
    For this to take effect right away, you may need to clear your local DNS cache by running a command on the machine your browser is running on, such as ipconfig /flushdns
    Graphical user interface, text

Description automatically generated

  6. Accessing Pi-hole with the DNS name with HTTPS, the web interface is now secured with a proper SSL cert that the browser does not warn about.
    Graphical user interface

Description automatically generated

  7. At this point, for other applications to use the cert/key, we need to create a certs user group, add the Node-RED user account to the group, and grant the group permissions to read the cert/key files. This ensures that when the certbot renewal is manually run, the applications will continue to use the renewed certificate with no further configuration required.

    sudo groupadd certs

sudo usermod -a -G certs nodered

sudo usermod -a -G certs domoticz

sudo chown -R root:certs /etc/letsencrypt/live

sudo chown -R root:certs /etc/letsencrypt/archive

sudo chmod -R 750 /etc/letsencrypt/live

sudo chmod -R 750 /etc/letsencrypt/archive

Text

Description automatically generated


  1. To add the certificate to Node-RED, edit the settings.js file
    sudo cp /mnt/dietpi_userdata/node-red/settings.js /mnt/dietpi_userdata/node-red/settings.js.bak
    sudo nano /mnt/dietpi_userdata/node-red/settings.js
    Edit the lines used in the previous guide to specify the self-cert/key to instead use the cert/key files provided by the LetsEncrypt wizard. Use ctrl-X to save.
    Text

Description automatically generated

  2. Restart the Node-RED service and access Node-RED via the HTTPS URL and port 1880
    sudo systemctl restart node-red
    A screenshot of a computer

Description automatically generated with medium confidence

  3. For Domoticz, edit the domoticz.conf configuration file. Update the 3 SSL configuration lines as follows (with the cert/key file paths provided by the LetsEncrypt wizard). Save with ctrl-X
    sudo nano /mnt/dietpi_userdata/domoticz/domoticz.conf
    A screenshot of a computer

Description automatically generated

  4. Restart the Domoticz service
    sudo systemctl restart domoticz
    Domoticz is now accessible via the HTTPS URL on port 8424
    Graphical user interface, text, application, website

Description automatically generated


When it’s time for certificate renewal, you should get an email from LetsEncrypt (about half month before renewal). At this point some steps will need to be repeated. If the IP address provided by your ISP has changed (or if you deleted the DNS record), step 1 will need to be performed again. Steps 2 and 3 will need to be performed again to complete the renewal (just be sure to disable/delete the port forwarding rule when completed). Keep in mind that services will need to be restarted (or reboot the OS) to pick up the renewed certificate.

The certbot renewal process will automatically attempt to run, which in the case you’re serving a public web server, should take care of itself so long as the DNS record and port forwarding exists. Additionally, it is possible to perform validation with a DNS challenge, but this would require your DNS provider has an API and you would need build this into your certbot setup. 


Sunday, February 6, 2022

RadSens - Smart home enabled Geiger Counter

Last year I was checking out some projects on Hackster.io and I stumbled upon this post about an Arduino compatible dosimeter/radiometer based on a Geiger-Müller Tube. Somebody actually made an Arduino compatible Geiger Counter (what I am going to call it anyway), so naturally I had to add it to my collection. I previously wrote about monitoring radon (which can be more harmful than other ionizing radiation being that alpha radiation is the most destructive form of ionizing radiation when inhaled/ingested). 

While it may not be as important to measure other forms of ionizing events such as cosmic radiation, it is still interesting in that it could be used to correlate soft errors in high performance computing environments (which is typically mitigated by ECC memory or radiation-hardened microcontrollers). Not to mention the fact that quantum computing could be even more affected by cosmic radiation.  If you are reading this, like me you are probably simply concerned about long term health risks of exposure to radiation/ionizing events, like the risk of radon exposure. If a gamma-ray burst  or a cloud of radiation were to come through my area, I would like to know about it no matter how brief. Since I have the radon sensor in the basement, I am running the Geiger Counter setup on the second floor to hopefully catch any readings from airborne or cosmic sources of ionizing events. I will go over how I set this up to report sensor values into Domoticz, but there is also a setup for Home Assistant as well.  


Graphical user interface

Description automatically generated


  1. I placed an ESP32 dev board (ESP-WROOM-32 with pre-soldered pin headers) on a breadboard, connected the Radsens unit to the 3.3 and ground pins (with Dupont jumper wires), and connected the I2C pins to the D21 and D21 pins for the ESP32 dev board (refer to the schematics and the pinout for your specific dev board.

    The pin numbering starts from the corner of the board.
    Table

Description automatically generated

Pinout for the ESP-WROOM 32 dev board
Graphical user interface, chart

Description automatically generated

  1. Supplying USB power to the dev board powers the RadSens unit. Out of the box, functionality is confirmed by the blue LED lighting up every time an ionizing event is detected. Ideally a protective case would be built for this setup; otherwise make sure it’s in a place that it won’t be disturbed or exposed to water or humans/animals (touching the Geiger–Müller tube can result in false positive detection for ionizing events).

    A picture containing electronics, circuit

Description automatically generated

  2. I modified the I2C_rad_test.ino Arduino sketch to add support for MQTT to transmit sensor data to Domoticz. This required installing the Adafruit MQTT library, and I also used the Simple Timer library (in case I needed to add other functionality like other sensors to read from). If you haven’t yet added ESP32 support to the Arduino IDE, navigate to File -> Preferences and paste https://dl.espressif.com/dl/package_esp32_index.json into Additional Boards Manager URLs. To install the libraries, navigate to Tools -> Manage Libraries and search/install the libraries.

    Graphical user interface, text, application, email

Description automatically generated

    Adafruit MQTT library
    Graphical user interface, text, application, email

Description automatically generated
    SimpleTimer library
    Graphical user interface, text, application, email

Description automatically generated

  3. After connecting the dev board, be sure to set the board type and set the com port to whatever com port is detected. If your operating system did not automatically install the drivers, they can be downloaded from here.

    Graphical user interface, text, application

Description automatically generated

  4. I published the sketch (and required files from the original repository) on GitHub. You’ll need to download the .zip file, extract it, and open the Radsens_to_Domoticz-main.ino file. In the #define section, you’ll need to configure wifi settings, MQTT settings, and the IDX for a “custom sensor” virtual sensor for both the dynamic and static sensor readings. The sensor readings are measured in CPM for “count per minute” (of ionizing events). I added some functions to the original sketch (as to putting the additional code in the main loop) so as to easily update if a new version of the original sketch is released for a bugfix or new features. I also commented out almost all unnecessary code which can be un-commented for troubleshooting/debugging.

    Domoticz “custom sensor” virtual sensor
    Graphical user interface

Description automatically generated

    Settings to configure
    Text

Description automatically generated

    Function that takes sensor values, builds the payloads, and sends to Domoticz via MQTT
    Text

Description automatically generated

  5. After uploading the sketch, if everything has been configured properly, sensor readings will be available under the Utility tab in Domoticz.

    A screenshot of a computer

Description automatically generated with medium confidence

    Chart, line chart

Description automatically generated

  6. Notifications can be set for various sensor readings. I found a chart listing some levels of radiation and set some notifications. While some of the charts I found have slightly conflicting guidance (“seek shelter immediately” for > 100 CPM vs “no need to panic”), I decided to play it safe being that I don’t live near an industrial area.

    Domoticz notifications
    A screenshot of a computer

Description automatically generated

    Advice to shelter immediately with CPM readings of 100 or more
    Daily Local Background Radiation Levels and Advisories :: Sunshine Coast  Computer Club

    Advice not to panic, but to take caution for CPM readings of 100 or moreTable

Description automatically generated

  7. The dynamic sensor readout is useful in detecting short term conditions, such as for a local pollution search (or perhaps a gamma-ray burst).

    Text, letter

Description automatically generated

  8. The static sensor readout is more appropriate for measurement of constant background radiation.

    Text, letter

Description automatically generated

  9. The impulse counter could be used to augment the built in LED that flashes every time an ionizing event occurs. Perhaps some code with a short delay in the main loop that sends a UDP real-time packet to a WLED device to trigger some fancy radiation themed lighting. Maybe I will write about this in a future post!

    Text

Description automatically generated

  10. Also, for additional insight into the data, I have my MQTT broker bridged with AWS IoT Core with a rule to send sensor data to AWS Timestream (which can be visualized with Grafana, which I have running in docker/ECS). I also have a rule that sends the data to a lambda function that formats the data as StatsD format and sends it over to a Graphite-Statsd docker container I have running on an ECS instance. 

    Timestream + Grafana
    Graphical user interface, chart

Description automatically generated

    Lambda function + Graphite-Statsd
    Chart, histogram

Description automatically generated